Showing posts with label art supplies. Show all posts

Monday, 16 August 2010

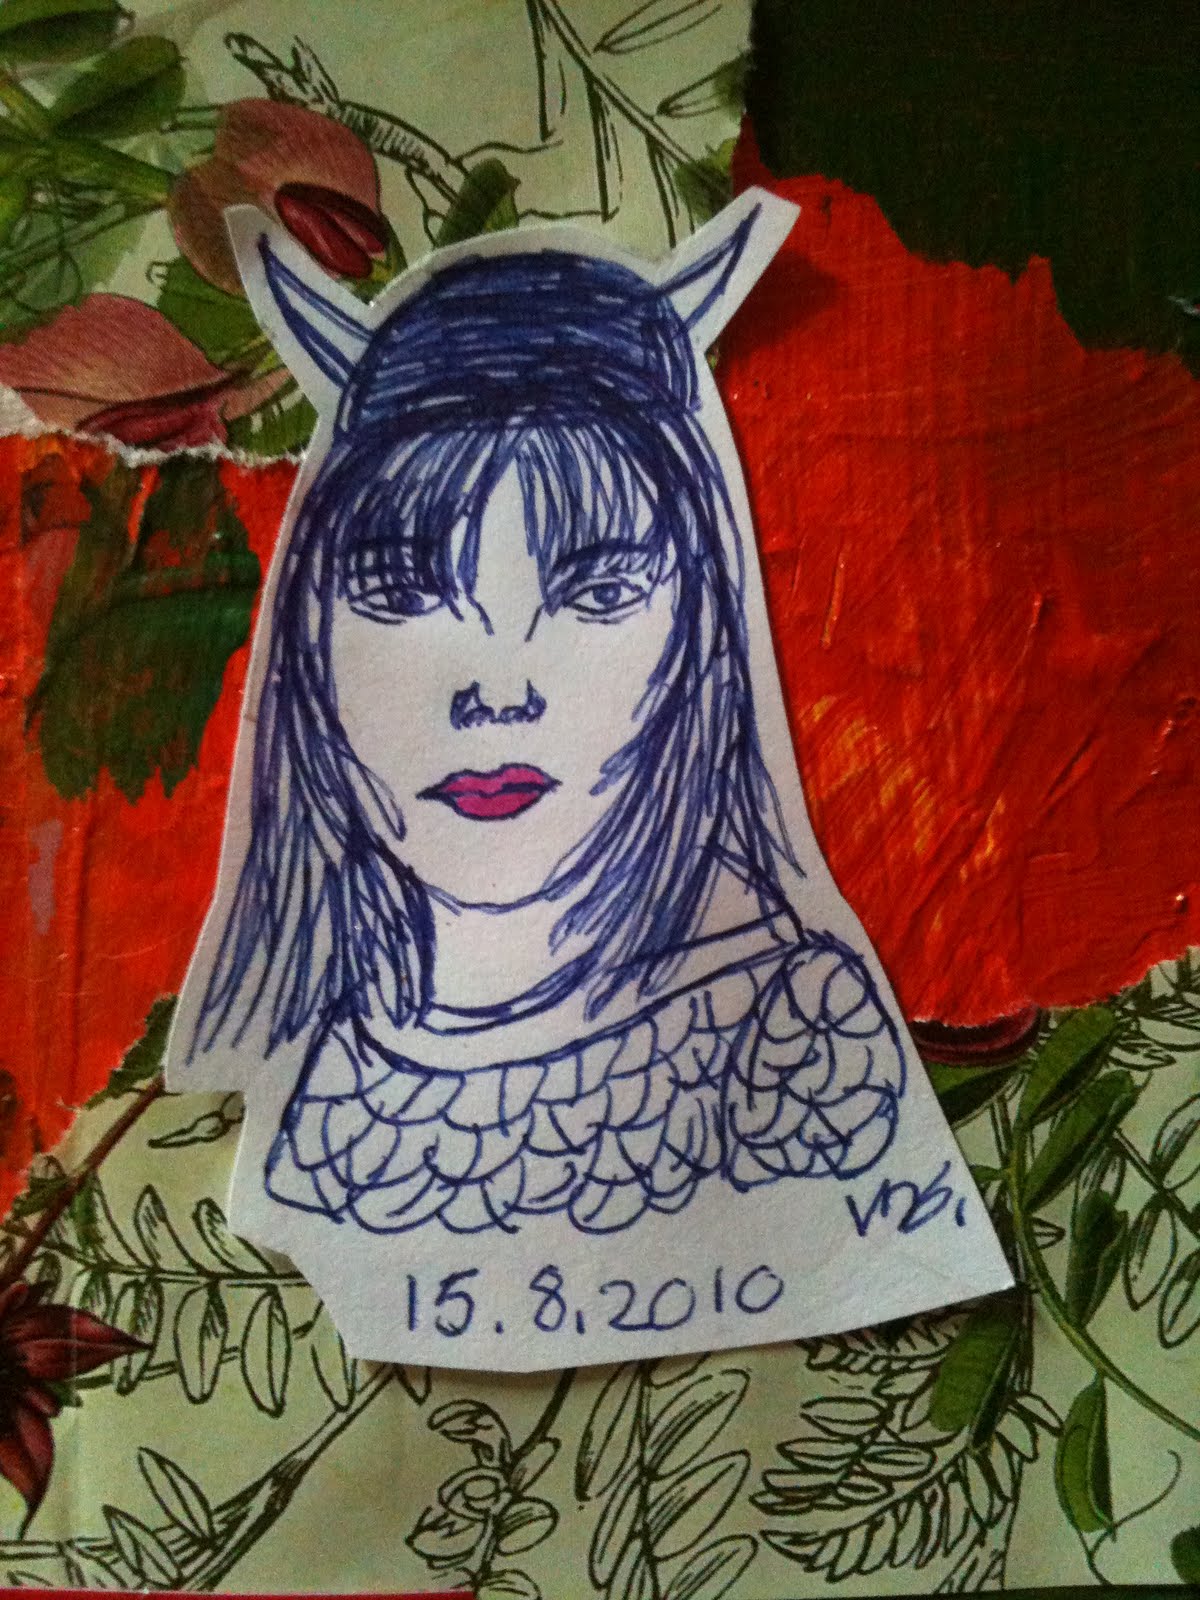
Viking Woman


Viking women were not allowed to take part in battle, but if they conquered new land, women would have to come so that a permanent settlement could be build up.Women would have taken their children and all their live stock with them, so the voyage over the sea would not have pleasant. Women would only have gone on peaceful immigration trips, rather than raids.
But for example in england, there is evidence(in the form of women's jewelry)that viking women were there by the 10th century.The viking word for woman was Ginna. Pagen graves are wonderful, as they give us insight into the cultur of the vikings. In scotland there were two female graves found, of very diffrent women: the young, stout and wealthy mother of newborn twins from Westness, and the high-status, elderly woman from Scar, buried in a boat along with a younger man and a child, a matriarch, perhaps even a priestess of Freya.
The mythological poem Rígsþula, written down in medieval Iceland, accounts for the divine origin of the three main social classes. But it also gives us a snapshot of daily life in the Viking Age. The woman of the slave-class wears 'old-fashioned clothes' and serves bread that is 'heavy, thick, packed with bran... in the middle of a trencher', with 'broth in a basin'. The woman of the yeoman class wears a cap and a blouse, has a kerchief around her neck and 'brooches at her shoulders', and is busy with her spindle, 'ready for weaving'. The aristocratic woman is just busy preening herself: she wears a blouse of smooth linen, a spreading skirt with a blue bodice, a tall headdress and appropriate jewellery, and has very white skin. She serves silver dishes of pork and poultry on a white linen cloth, washed down with wine.The standard Viking Age house was rectangular and had just one room, in which everything took place around a central hearth. This house type has been found from Sweden in the east to Newfoundland in the west, in both rural settlements and in towns such as York and Dublin. As in most traditional societies, women spent much of their time indoors in such houses, cooking, making clothing and caring for children and the elderly, but they would also have had responsibility for the dairy.
Some women made their mark through exceptional status or achievement. One of the richest burials of Viking Age Scandinavia is that of the Oseberg 'queen', buried in a very grand style with a richly-decorated ship and large numbers of high-quality grave goods in 834. Later in that century, Aud the 'deep-minded' lived a veritable Viking Age odyssey. The daughter of a Norwegian chieftain in the Hebrides, she married a Viking based in Dublin and, when both her husband and son had died, took charge of the family fortunes, organising a ship to take her and her granddaughters to Orkney, Faroe and Iceland. She settled in Iceland, distributing land to her followers, and was remembered as one of its four most important settlers, and as a notable early Christian.( source:BBC )

Yesterday I drew the viking woman above and I just love how she turned out and enjoyed the way in which I drew her. I want to draw one girl like this a day. What I do is take an image from a magazine and draw it using a cheap biropen. I cannot rub any thing out and have to accept the flaws and this really helps me love my drawings. When the image is complete, I have a good look at her and if she looks to me like something, in this case a viking, I add the feature needed to show this, in this case a viking helmet. I use an artists pitt pen to colour in one feature that I want to stand out. I love drawing in biropen!!

Thursday, 12 August 2010

Art supplies i am loving at the moment , a journal page and handcarved stamps!!!


Last week I finally got round to carving my own stamps. YAY!! I simply bought a piece of lino, cut down to size, drew on image and started to carve away. It was so much fun and very simple.I did find this vlog video by samantha kira very useful.But it really was so easy and fun. If you have never carved a stamp before, I recommend you watch the video by samantha kira, go abuy the supplies and get carving. I carved an arrow and a Mighty Boosh head( if you do not know this, watch a vid of it on youtube and you will laugh your head off!!!Link at end of article).


I have also created this cool journal page. I had so much fun creating it. First I scribbled around a bit with watersoluble neocolours and then I dry brushed some gesso over it. I did a biro pen drawing of a girls face and added a coloured bookpage t-shirt. i created the flower and then played around with pen and ink. Lastly i coloured in a few things with artists PITT pens.


These are a few art supplies I am loving lately. Mini alphabet stamp set(reat for spelling out words or to use for journaling instead of your own handwriting.), neocolours II in lots of cool colours, artists PITT pens in lots of colours, my brand new aluminum tape, pen and ink, gel medium and carving stamps!!!


What art supplies are you into at the moment?
Do you have any blogpost requests?


LINKS:
The Mighty Boosh: The power of the crimp(I think this is the best intro episode)

Saturday, 7 August 2010

Cobra water mixable oil paint review


I saw this free sample Cobra paint tube today, when I was browsing my local art shop. I took a sample of course and as soon as I came home, I started testing out roughly how they work. But basically they are water mixable oil paints. It also says on the packaging that they wash out of fabric with water. This makes me so excited, because I am always getting acrylic paint on my clothes and this puts me off painting a bit, but only 0.1%. All the same, if it will wash out, this makes me super happy!!!
Anyway, I tried the paint out and it acts like a mixture between acrylic paint and oil paint. It still takes a while to dry, it has than oil paint glossiness about it and lets itself blend together like oil paints, but it blends well with acrylic paint (i did do this, but with an orangish red acrylic paint) and I have worked with both acrylic and oil before and when working with this, it just feels like a really fantastic feel to it. I friking LOVE this paint, when I next go there, I will buy myself some of this.
Now onto the next claim: it washes out of fabric.I am so happy about this factor and I tried it and it works. Above you can see before and after of a piece of fabric which I put some paint onto and then washed out. There is a kinda orangish tint to it, which was not what happend, the glue (I used my homemade glue, yay it glues fabric to:)), which I brushed over it, blended the colour onto the fabric. But before I glued it on, it had one tiny spec of paint on it. Click on the image and look at it in big and take a good look at it, you will see the effect.

So over all
  • 99% of the paint washes out
  • It takes long to dry
  • It blends well
  • It works in conjuction with acrylic paint to
  • It feels like working with a mix of oil and acrylic paint
I give these paint 8 out of 10. I will go buy some more of this, will you?
Have you tried this paint before? What did you think?

Their website is here.

Ps: Here is a fab new podcast, I have discovered called the VooDoo Lounge. Click on the podcast sidebar. and this website Carla Sonheim: Snowball Journal

have fun creating Art!!!

Friday, 23 July 2010

My own sponge adventure


Today I was down the town and went into a shop for lunch. On my way out I saw a pack of 13 sponges for 1 pound and so I bought it. They are multicolored makeup sponges (in pink, purple, white and blue). I came home and sat down to start playing with them and to watch Samantha Kira's Studio Vlog. Then what do I see? This week she is playing with sponges too. How weird is that. I thought my makeup sponges were amazingly cool to work with, they got me an awesome i smudged the paint with my fingers effect , but I did not get my hands dirty. I also found some bubble wrap and used it to create to prints and covered in paint applied with a makeup sponge. I had earlier today, drawn an Owls head. so I decided to cut it out and glue it down. I also used my red and orange shimmering H20 watercolours, a strip of patterned paper and some gelpens and pen and ink. To finish off this page, I wrote about me becoming a vegetarian. I have been for 3 weeks now and I think its fab.
Play with something cool in your journal and leave me a comment about it.


XXO MAKEALIFE

Friday, 14 May 2010

Using your electronics to help your art!

Yes! I admit, sometimes I'll go on the computer and get sucked in for hours, when all I wanted to do was get some quick inspiration.But there are some things gadgets can really help you with.

Computer:

  • If you just need inspiration a tip:Google the first thing that comes into your mind, but search the images. As soon as you have found one to your likeing, print it out and switch your computer off. Now see where this image takes you...
  • Search for quotes you could use in your art
  • Set yourself say 10 mins(on a timer, i use the one on my phone) to surf the internet and then go off and be creative
  • If you have just bought a new art supply, search it in google, till you find a cool technique and then go and try it out
  • Print out alphabet sheets: Just go onto word, select a font and blow it up to the size you want, now print and voila!You can now cut these out and use in your Art journal

Moblie Phone:

  • Use as a timer for the above
  • Connect it to your computer and print and use the photos on it. Your phone will have the best (not best quality) photos on it, as you can just grab it and snap a picture when it seems right

Iphone:

  • Listen to music
  • Get a quote app, randomly select a quote and use this in your page
  • Keep a list of things you love or hate or something like that and use this in your art

Those are my ideas on this subject, if you have any ideas please leave in a comment below also leave any requests for futur blogposts below.

MAKALIFE xo

Thursday, 1 April 2010

Talk about the product:Paintbrushes Part 2

Okay, let's continue were we left of.
There are many, many Paintbrush sizes out there and you have to just experiment with different sizes, until you find your perfect size for you. It will also depend on what you want to do with it. For painting details such as fasces, I like to use a round sable brush in 4, 6, and 8. But if I want to just paint the background, I prefer to use a bigger size flat, sturdy brushes like size 10 or 12.

The last thing that you need to know is that there are different types of brushes, which get divided into 3 categories.
  • Round brush: Exactly what it sounds like. Rounded with a pointed tip. Works well for painting details, but when bought in a big size also good for big surfaces and flat washes.
  • Mop brush: This is similar to a round brush, but just a bit more flimsy. This is used for laying large areas of colours quickly.
  • Flat brush: You guest it, this brush is flat. It is good for painting large areas.

That's what I would call the basics. Now this is the same with almost every art supply and technique.T he best way to learn is to just experiment. A last tip: do not buy cheap brushes, or else the hairs will start to fall out and stick to whatever you are painting.

Tuesday, 30 March 2010

Art journaling 101:Paper and journals

The first thong you will need if you want to start art journaling is a surface to work on.I like to have my art journal and then have some side projects on other surfaces.There are two basic options for art journaling:

1.A journal

2.A artbox: you work on paper and then collect in a box.

Lets take a closer look.Basicly you have to choose wether you want to work in a journal or if you want to work on seperate pieces of paper and then collect these in a box.
For the journal you have many options.But i recommend one with strong paper such as a cardstock kind or watercolour paper, though you may want to try out a few diffrnat kinds to get your personal prefrence.If you want to buy a journal, i recommend a moleskine the watercolour or sketchbook kind.Get a size you feel comfy with.At the moment i am working in a huge book.Which is nice to have so much room, but i think i like a smaller portable one best.If you dont want to buy a journal, you can make one.Just search in youtube or google and you will find many wonderful tutorials.Now lastly if you do make one your self you will be able to pick the cover decoration and the paper.Also you have the choice between a bound or a spiral bound art journal, both are fine.But in a spiral bound one, id like to try one for my next journal, it will be harder to work in a two paged spread.

If you want to go with a box: You will be able to buy lots of diffrent papers and then decide on them at the spur of the moment.The box should be big enough to hold all your diffrnt paper sizes.You can use any kind of box, a shoebox, zigarette box...Decorating the box is half the fun , so be creative.

I will be contining this series, so keep coming and reading.
Happy art journaling!!

Springtip:
Take your art journal outside or by a window and make art outside!!!!

Wednesday, 24 March 2010

My Handmade art journal(with tips for making your own)


The most basic art journaling supply is a good journal.I have used 3 sketchbook moleskins, 1 watercolour moleskin and an altered book so far. This is my first ever art journal I have made.My next planned one is like this one on journal girl( http://www.journalgirl.com/httpwwwjournalgirlcom/2010/2/17/diy-wednesday-wire-bound-journals-can-be-cool-and-easy-to-ma.html).
On to my actual made journal. Above you can see the cover.It is made from some ikea fabric with a scrap fabric colour wheel on it.I thought this was such a cool idea.This art journal has 44 pages, it is made half from watercolour paper and half from drawing paper.I really love this combo, as i can switch between the two kinds of papers depending on my mood.Here is a quick description of how I made the journal, sorry I didnt take any during photos.The reason why I am not turning this into a tutorial with images is cause I learned how to make it of a friend as I went along.Any way, first I folded the paper down to size and sewed up the folds. I loosly attached the segments with thread ans then glued the spine using white glue.I let it dry and cut a cover from book board.Next i cut a thin strip for the spine.I cut holes in the cover and thread 3 pieces of woven fabric through it. Glue down.Cover spine with bookcloth sandwiching the spine bookboard and glue.Make the coverquilt.Glue down cover and DONE!!

The back and pages!

So here are my tips for book making:

  1. Make your cover personal in some way. You could sew a fabric cover, paint some fabric or paper, cover in paper and then paint once on cover.Try to dipict some symbol or the colour wheel that reminds you of what your art journal means to you.For me I want to grow as an Artist and show all the colours of my life in it.
  2. When glueing, protect pages with some baking paper
  3. Wash glue brush well with soap after glueing or you will kill it(talking from experiance)
  4. Use your favorite papers in a combo that works for you

The beautiful inside paper!!!

5.Save any scraps you may get(like from the above paper) to use in collage
6.Use a bonefolder to create lush folds

Hope these tips and Images inspire you to try your own handmade art journal.

Makealife XO

Sunday, 14 March 2010

Let's talk about the product: Paintbrushes PART 1

A^ny artist needs paintbrushes, no matter if she paints wonderful country scenes or just messes around in her art journal.There are so many brushes out there, by the time you have finshied reading this post , you will know which one is for you.So let's get started. Paintbrushes can be made from many diffrent knids of hairs, this will effect the way the paintbrush will work for you:
  • Kolinsky sable: Is a harsh climated region of southern Siberia. This paintbrush is very strong, but still supple and springy.
  • Red/Pure sable: Made from selected Kolinsky hairs, these brushes keep the springyness of Kolinsky but add there own softness to the paintbrush.Ideal for painting detaIL.
  • Squirrel Hair: Cheap, but don't point well and have little resistence. But this may be perfect for painting backgrounds.
  • Oxhair and goathair: Sturdy brushes but do not point well.these brushes are strong making them great for ruffer treatment such as drybrushing.
  • Synthetic fibers: hold less colour than real hair, making them cheaper.

There are also a huge variaty of combo brushes, these combine two or more of the hairs above.

CARE OF BRUSHES: This is very important, if you treat your brushes well they will work better for longer.if you do not, hairs may fall out, points broken or all the hairs stuck together in a gewy mush! So here are some top care tips:

  • Keep tehm in a box or stand them up in a jar so that the points to not get ruined.
  • Wash after use.First rinse the colour out a bit, then mush the hairs into soap and work it in with your fingers.
  • Clean tha handle to
  • Moisten brushes before use or else a film of paint will build up , which kills paintbrushes.
  • Do not leave in water for to long or the hairs will become distoreted and the paintbrush handle paint will flake off.

More in part 2

Friday, 19 February 2010

Let's talk about the product!: Neocolour II watersoluble crayons


Today I am going to start a new series on my blog.Every so often (at least once a month)I will tell you all I know about a product.This can be my own techniques and ideas on how to use, links to good resources or videos that show you techniques.The art product I'm talking about today in NEOCOLOUR II.
I love watersoluble crayons they are so highly pigmented it is lovely to just smuch them onto a page in a random way and then add a bit of water and they will transform into a fab background base.Of course you can also draw patterns and then let them blend.The Neocolour II is the only kind of watersoluble crayon I have tried so in this post all my results will be with these.

In my many months of art journaling I have found that:
  • These crayons work on any surface, cardboard,paper,canvas,silver foil , coffee filters just to name a few.Experiment!I'd love to hear what surfaces you have tried it on.
  • They are a bit sticky.I have figured out a little technique to stop their stickyness.Instead of water solubleing(is that a word?) them with water use watery white acrylic paint or gesso.This tones the colour down a bit but stops any stickiness(although sticky ness normally occors before you put water on them ,but whatever).
  • Most gel pens don't work or at least not well over them.Ones that do work:Tip ex pen, other crayons.If you user the technique above pretty much all pens work though.

Now reasons why you should buy some:

  1. They are fun to play around with
  2. They are clean
  3. As they are in crayon form you can take them anywhere with you

Some fab links:


Note: Neocolour I is not water soluble and Neocolour II is, just remeber thaat when you go out to buy some.
So that is all I know(or can think of now) about neocolours, so go buy yourself some and start using them and comment below on how you use your crayons.

Makealife

Friday, 8 January 2010

I love my new crochethook and my palette knife


What do you think of teh face above?I bought myself a palette knife and i am learning to use it.Well i am just experimenting really but its fun and thats all that matters.The way i use my palette knife is to just grab a dooleb of paint on to it and then to smear it to the page.


I am working on a little croched stripy bag....


This is the crochet hook i am using.It has like a padded area so when you hold it , it is softer on your hands.You should really try it sometime soon

Saturday, 2 January 2010

My December faves(art supplies)

This is a new monthly series i am starting.At the end of each month I will show you what my favorite art supplies of the month are and some ways to use them, which I think is cool.Cause then you can go out and get your own...If you have any questions or requests just comment below.So lets start;
1.Artists PITT pens
I love these pens and use them in almost every journal page i make.For writing, drawing , doodling and to do mandala doodle pages.I love the all of them but the essentials are just black in all four sizes.The colours are just a bonus:)
2.My little winstor and newton watercolour set:
I am really loving watercolours lately.You can use them for so much painting pictures, backgrounds , on paper and then collage it in...
3.A mini canvas and stand:
It is so cute , a friend gave it to me and I love it. But its just deco.
4.Palette knife:
You can apply paint in a cool 3d effect.And its lovely to create textures in the background and right now, i am working on a cool journal page where i have used a palette knife and a tipex pen to create a face.Post it when done.Mine is a 1018 conda.
5.A tipex pen:
This is such a cool thing, you can write and draw and doodle with it all over your page.
6. uni ball signo broad pen ;
in white(for doodling onto magazine cut outs and on a dark background and one in metallic pink just to doodle and write with.
7-A mini natural sponge:
This can be used to make backgounds and to ad depth.Like here:my collage bookmark tutorial http://makealifeandmore.blogspot.com/2009/12/tutoriallast-minute-pressiecollaged.html .
8.A cool . but weird double sided tape dispencer:
For sticking stuff
9.A flat paintbrush:
nr.6 da vinci-college 8740
for painting:)
So these are my faves in dezember.I will do another one at the end of january.
Happy art journaling!!!!!!