Wednesday 31 March 2010

Colour mixing 101


I have realised by watching the journal girl video yesterday, which is brill by the way and you just have to watch, that a few art journalers really do not know how to mix colours.So it is high time for a crashcourse.All this info is from my own brain, so sorry if its formulated in a weird way.

Above you can see the cover of my current handmade art journal.It is a colour wheel.You probably know that red, blue and yellow are prime colours.This means that you cannot mix them.Therefore they are basic colours!White and black are also basic colours, so you will need these okay?Now look at the colour wheel now can you see that between the yellow and the red there is orange?Good, this means that if you mix yellow and red together you will get orange.Between the red and the blue there is purple, so if you mix blue and red you get purple.Lastly between the blue and the yellow you can see green, so blue and yellow makes green.

There. Now you know the absolute basics to colour mixing.I recommend you try all this out for yourself though, to get the feel for it.Now lets take the example of mixing red and yellow(=yellow) If you mix these in a 1:1 ratio you will get a pretty basic orange.If you put in more red than yellow, your orange will be a bit more redish.If you put in more yellow, it will be yellowisher(is that a word?!).This can be fun to play with.This is the same for all the colour combos, i talked about above.

If you mix all the colours together you will get brown.But you also get brown when you mix red, black and yellow in the ratio(roughly)2:2:1.Black and white cannot be mixed.If you add black to a colour it will go browny or greyish depending on the colour.Normally you only add a tiny, tiny bit of black to your colour mixing.If you mix black and white together you will get grey.Again the more white used the lighter the colour will be.The more black you use, the darker it will be.If you add white to colours they will get lighter but also go kinda paleish.So if you have blue and add white it will become a more baby blue.

Pink can be mixed by adding white to red, though if you want a magenta colour, i would buy this to as it can be very hard to mix.Basiclly when mixing if you add a colour the mixed colour will become more like that colour.Do you get me?

Lastly if you really want a colour to pop out, then pick say red and then take the colour that is across in the colour wheel so blue or green.

Thats my basic colour mixing crash course.Now just experiment!!!!!!!!!!!!!!!!!!!!!!!!!!!!!!!!!!!!!!!

Tuesday 30 March 2010

Art journaling 101:Paper and journals

The first thong you will need if you want to start art journaling is a surface to work on.I like to have my art journal and then have some side projects on other surfaces.There are two basic options for art journaling:

1.A journal

2.A artbox: you work on paper and then collect in a box.

Lets take a closer look.Basicly you have to choose wether you want to work in a journal or if you want to work on seperate pieces of paper and then collect these in a box.
For the journal you have many options.But i recommend one with strong paper such as a cardstock kind or watercolour paper, though you may want to try out a few diffrnat kinds to get your personal prefrence.If you want to buy a journal, i recommend a moleskine the watercolour or sketchbook kind.Get a size you feel comfy with.At the moment i am working in a huge book.Which is nice to have so much room, but i think i like a smaller portable one best.If you dont want to buy a journal, you can make one.Just search in youtube or google and you will find many wonderful tutorials.Now lastly if you do make one your self you will be able to pick the cover decoration and the paper.Also you have the choice between a bound or a spiral bound art journal, both are fine.But in a spiral bound one, id like to try one for my next journal, it will be harder to work in a two paged spread.

If you want to go with a box: You will be able to buy lots of diffrent papers and then decide on them at the spur of the moment.The box should be big enough to hold all your diffrnt paper sizes.You can use any kind of box, a shoebox, zigarette box...Decorating the box is half the fun , so be creative.

I will be contining this series, so keep coming and reading.
Happy art journaling!!

Springtip:
Take your art journal outside or by a window and make art outside!!!!

Friday 26 March 2010

Cosmetic animal testing


I think cosmetic animal testing should be banned.Why? Because beauty products are not a necassary for our health. Why shoul animals suffer just so that we can supposingly look pretty? Animals suffer a great deal when been tested on. This can result in liver problems swollen eyelids and bleeding. Often animals die or are killed after the testing!!Currently the big makeup company L'oreal continues to test on thousands of animals each year.They secure rabbits so that they cannot move and then test an ingrediant of them, by putting it into their eye.Rabbits are used because they have no tear ducts and cannot relife the stinging or pain.Also they often forcefed a group of animals an ingrediant until they die.These are just two terrible examples.(please click on link above for more info).

Also animals are really quite diffrent from us and therefore the results are not even all that accurate!For example the blood vessels in many animals are contributed in a diffrent way from ours, making their skin react in a slightly diffrent way.

Lastly makeup is not a need. We will not die if we do not wear makeup. But if we do animlas will die.I am not trying to say that we should stop wearing makeup.We should just urge companies to stop testing on animals.There are a few alternatives:Using existing results, i mean makeup has been around for a long time , so why should we have to create even more?If companies see this as the only way to make money, why don't they use ingredients that we already know are safe?Also we could use human volunteers.You may be apaleed by this, why should humans suffer?But consider that this is exactly what we are doing to animals.

Hopefully by know you will agree with me. But how can you help?

How can I help?

A very simple way you can help is buy nor buying from animal testing companies and more importantly supporting the ones that do.Here is a very good guide on the which ones do.Here is another good resource on how o find bad companies.

Wednesday 24 March 2010

My Handmade art journal(with tips for making your own)


The most basic art journaling supply is a good journal.I have used 3 sketchbook moleskins, 1 watercolour moleskin and an altered book so far. This is my first ever art journal I have made.My next planned one is like this one on journal girl( http://www.journalgirl.com/httpwwwjournalgirlcom/2010/2/17/diy-wednesday-wire-bound-journals-can-be-cool-and-easy-to-ma.html).
On to my actual made journal. Above you can see the cover.It is made from some ikea fabric with a scrap fabric colour wheel on it.I thought this was such a cool idea.This art journal has 44 pages, it is made half from watercolour paper and half from drawing paper.I really love this combo, as i can switch between the two kinds of papers depending on my mood.Here is a quick description of how I made the journal, sorry I didnt take any during photos.The reason why I am not turning this into a tutorial with images is cause I learned how to make it of a friend as I went along.Any way, first I folded the paper down to size and sewed up the folds. I loosly attached the segments with thread ans then glued the spine using white glue.I let it dry and cut a cover from book board.Next i cut a thin strip for the spine.I cut holes in the cover and thread 3 pieces of woven fabric through it. Glue down.Cover spine with bookcloth sandwiching the spine bookboard and glue.Make the coverquilt.Glue down cover and DONE!!

The back and pages!

So here are my tips for book making:

  1. Make your cover personal in some way. You could sew a fabric cover, paint some fabric or paper, cover in paper and then paint once on cover.Try to dipict some symbol or the colour wheel that reminds you of what your art journal means to you.For me I want to grow as an Artist and show all the colours of my life in it.
  2. When glueing, protect pages with some baking paper
  3. Wash glue brush well with soap after glueing or you will kill it(talking from experiance)
  4. Use your favorite papers in a combo that works for you

The beautiful inside paper!!!

5.Save any scraps you may get(like from the above paper) to use in collage
6.Use a bonefolder to create lush folds

Hope these tips and Images inspire you to try your own handmade art journal.

Makealife XO

Thursday 18 March 2010

Studio Thursday 18.3.2010


Today these are mz last pages in mz altered book art journal.I have finished mz art journal I was making.Next week I have a post planned, where I will tell you more about this and give you some usefull tips for making journals.
But anyway on to the above picture:This page was all about me exploring in writing what my fave colour is.It turned out to be no colour but colourful things.I am going to make the prompts bold.I made them up myself.


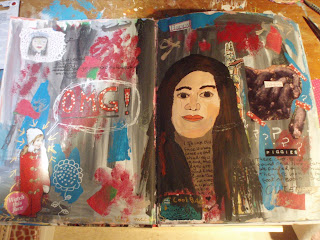
This was on a friday, I was just writing down all my feelings from the week.And did a bad picture of a person. the reason why i dont like it is the skin colour is to brown like mud(i ran out of red so had to use pink).


After seeing the movie alice in wonderland, this is my page to express what I thought of it. If you have not seen it yet, go do so. It is so f*** fantastic:)


My page were I talk about cosmetic animal testing, which is a topic dear to my heart. Did you Know that it can result in death, bleeding, swollen eyelids and liver problems(for the animals)?Make up is not a necassity. Humans should be tested on if they want it.Also currently the makeup company L'Oreal tests on millions of animals each year.They do test on rabbits, that have been secured so they cannot move, in which they out an igredient for the cosmeticsl product in their eye. They use rabbits as they do not have any tearducts, therefore they cannot realive the stinging or pain. If they die , the ingrediant is bad, I f they live its okay.So there. These are just some quick facts about animal testing, if you want to know more, I can create a post dedicated to this topic with an artsy twist.


A page about loving and exploring myself, the way mother nature made me(see the weird but cool face).I used watercolours for the tree and if you click on the image, it will appear bigger and you will be able to see a bit of shimmery green. This is metallic watercolours. A new thing I have discovered. I have now order a beginners set and once I have a bit of experiance , I will post a review.


Some weird doodles and todo lists.Do you like my Marie
Antoinette with a key in her hair?


So there, see you next week , when I will post my art journal that i made. But I will post a value post before that. Not quiet sure about what yet...Any ideas?What would you like to know about art journaling?A book review?Prompts?Product review?Colour mixing? Part2 of paintbrushes? A post about how to use trash as cool artsy supplies? What do YOU want?


Sunday 14 March 2010

Let's talk about the product: Paintbrushes PART 1

A^ny artist needs paintbrushes, no matter if she paints wonderful country scenes or just messes around in her art journal.There are so many brushes out there, by the time you have finshied reading this post , you will know which one is for you.So let's get started. Paintbrushes can be made from many diffrent knids of hairs, this will effect the way the paintbrush will work for you:
  • Kolinsky sable: Is a harsh climated region of southern Siberia. This paintbrush is very strong, but still supple and springy.
  • Red/Pure sable: Made from selected Kolinsky hairs, these brushes keep the springyness of Kolinsky but add there own softness to the paintbrush.Ideal for painting detaIL.
  • Squirrel Hair: Cheap, but don't point well and have little resistence. But this may be perfect for painting backgrounds.
  • Oxhair and goathair: Sturdy brushes but do not point well.these brushes are strong making them great for ruffer treatment such as drybrushing.
  • Synthetic fibers: hold less colour than real hair, making them cheaper.

There are also a huge variaty of combo brushes, these combine two or more of the hairs above.

CARE OF BRUSHES: This is very important, if you treat your brushes well they will work better for longer.if you do not, hairs may fall out, points broken or all the hairs stuck together in a gewy mush! So here are some top care tips:

  • Keep tehm in a box or stand them up in a jar so that the points to not get ruined.
  • Wash after use.First rinse the colour out a bit, then mush the hairs into soap and work it in with your fingers.
  • Clean tha handle to
  • Moisten brushes before use or else a film of paint will build up , which kills paintbrushes.
  • Do not leave in water for to long or the hairs will become distoreted and the paintbrush handle paint will flake off.

More in part 2

Thursday 11 March 2010

StudioThursday 11.3.2010


As I told you guys a while ago, I have started working in an old book about Indians. It is fun to use an old book, but i think I prefer using a blankbook.Because you don't have to worry about priming a page first or strenthening it in anyway. Also you cant draw or sketch very well, which i like to do a bit of sometimes. But it is a really good way to recycle and not spend any money and you should definately try it!!
Above is my page where I alowed myself to use only blue and the horse picture, that was already in the book. its fun to leave pictures or information showing that you like.


This next page was one I worked on over about a week doing a little bit everyday. There is another face!!I love painting and drawing fantasy girls. But you should draw people live to get the practise. This is a very good way to grow as an artists. Remenber though that if you make any mark on paper , that has a meaning to you, you ARE AN ARTIST.


This is just a nice pale page witha tone of doodling on it. This can be a very fun thing to do infront of the telly or in bed. Prepaint a page and them grab glue, scissora , magazines and pens and get to work.


This was my first every page in this art journal. i like the indian girl as far as shading goes, but i do not like her face shape but oh well.
@PAPERPHANTOM: Would this be an okay face to show you how to do shading on?That is to say do you like it well enough?

Okay guys, see you next thurs with more of my art and with other stuff before that.
XO MAKELIFE

I will leave you with a few prompts that i have thought up but not tried yet:

  • When you start a new art journal create a page about the techniques or prompts you want to use in this journal and at the end a page about what you acctually achived.
  • write a story and illustrate in your art journal
  • pick an animal, object or person and write all you know about this topic(you can pick any topic you like)
  • create a page around one word. This will be the only word you get to use on this page.
  • write down words that have to do with your day: what you did, weather, what you wore...
  • glue in colourful labels
  • try drawing faces or picture inclusiv shading using water solouble crayons

Have fun!!!!!(this is what I will serve you every week , my art and prompts or tips or quotes)


Tuesday 9 March 2010

TUTORIAL: How to mix skin colour

I love painting faces in my art journal and even though I may not be the best it is so much fun!But what I have noticed is that a lot of my friends just use face coloured paint from the tube. I love mixing colours and I personally consider this to be part of the creative process. So here you go:

First you will need three basic colours: red(but not a pinky tinted one, just a plain bright red), yellow( not a lemony yellow, just plain yellow) and white.NOTE:WHEN BUYING PAINT IT IS BETTER TO GET A FEW TUBES OF COSTY PAINT AS THIS WILL MIX BETTER THAN THE CHAP STUFF(DUE TO IT CONTAINING MORE PIGMENT.Any way back to our skin colour mixing.


Mix a pink.Use lots of white and only a bit of red until you get a pale salmony skin coloury colour.But don't worry if its still a bit dark we will get to that in a mo.Just make sure that it is the darker version of the colour you want, this is kind of hard to explain but after playing around with mixing a little bit you will understand.Practise makes perfect.


Add a tiny bit of yellow to make it turn from a tshirt , samon pink to a skin colour pink.Compare with a professional portrait (on a postcard) if youre one for perfectness. But again after a bit of experiance you will get the hang of this.

Lastly add white until it is the exact shade youe want. Tip: Test on a scrap piece of paperthat is the same kind as your piece you want to paint on.I have a page reserved for this in my art journal and then I use itr as a multicoloured background.
Happy painting!Would you like me to do more on how to paint a face so the next step, like how to draw it and paint in the shading?Or is there another colour youd like to know how to mix.I'm sure i can help, I have been painting for 5 years.
Before I go , you may have noticed the new feautre on my blog.Below just tick what you think of my post if you havent got time to leave a comment.IT would help me so much when writng future blogposts. Remeber I can only give you advice on things you tell me you want to know.
XO MAKEALIFE

Sunday 7 March 2010

Book review

March is book review month on my blog.Starting tuesday i will post lots of artsy and craft book reviews!!!
These will include:

Collage Unleashed
Acrylic revolution
Green guide for artists
1000 Artists journal pages
Zakka sewing
The decorated journal
knitknit
Sew darn cute
Sewing green
The naughty secretary club

See ya tuesday
MAKEALIFE

Wednesday 3 March 2010

Really cool face drawing tips from journal girl

Check it out:


Have fun drawing!!!!!